- Posts: 70
- Thank you received: 22
- Home
- Forum
- The Drydock
- Orders of Battle
- Battle of Cape Spada scenario
 Battle of Cape Spada scenario
Pugliese created the topic: Battle of Cape Spada scenario
8 years 8 months ago

I'm sure there's room for tweaking the victory conditions to make them a bit more fair for the RM player. I tried to use the River Plate scenario as a bit of a guideline. I'm also aware of the possibility that the RM player could in theory hang around the home edge until turn four and attempt to retreat, so beyond "it's the whole intent of this scenario that you engage" there could probably be a better incentive. There also could probably be a better attempt to incorporate some terrain. Thoughts?
I've been working on a scenario for the Battle of Cape Spada, with an eye toward it being a small historical scenario that would lend itself to demo games (more than likely with the player receiving the demo playing the Royal Navy, since it's a very lopsided scenario points wise).
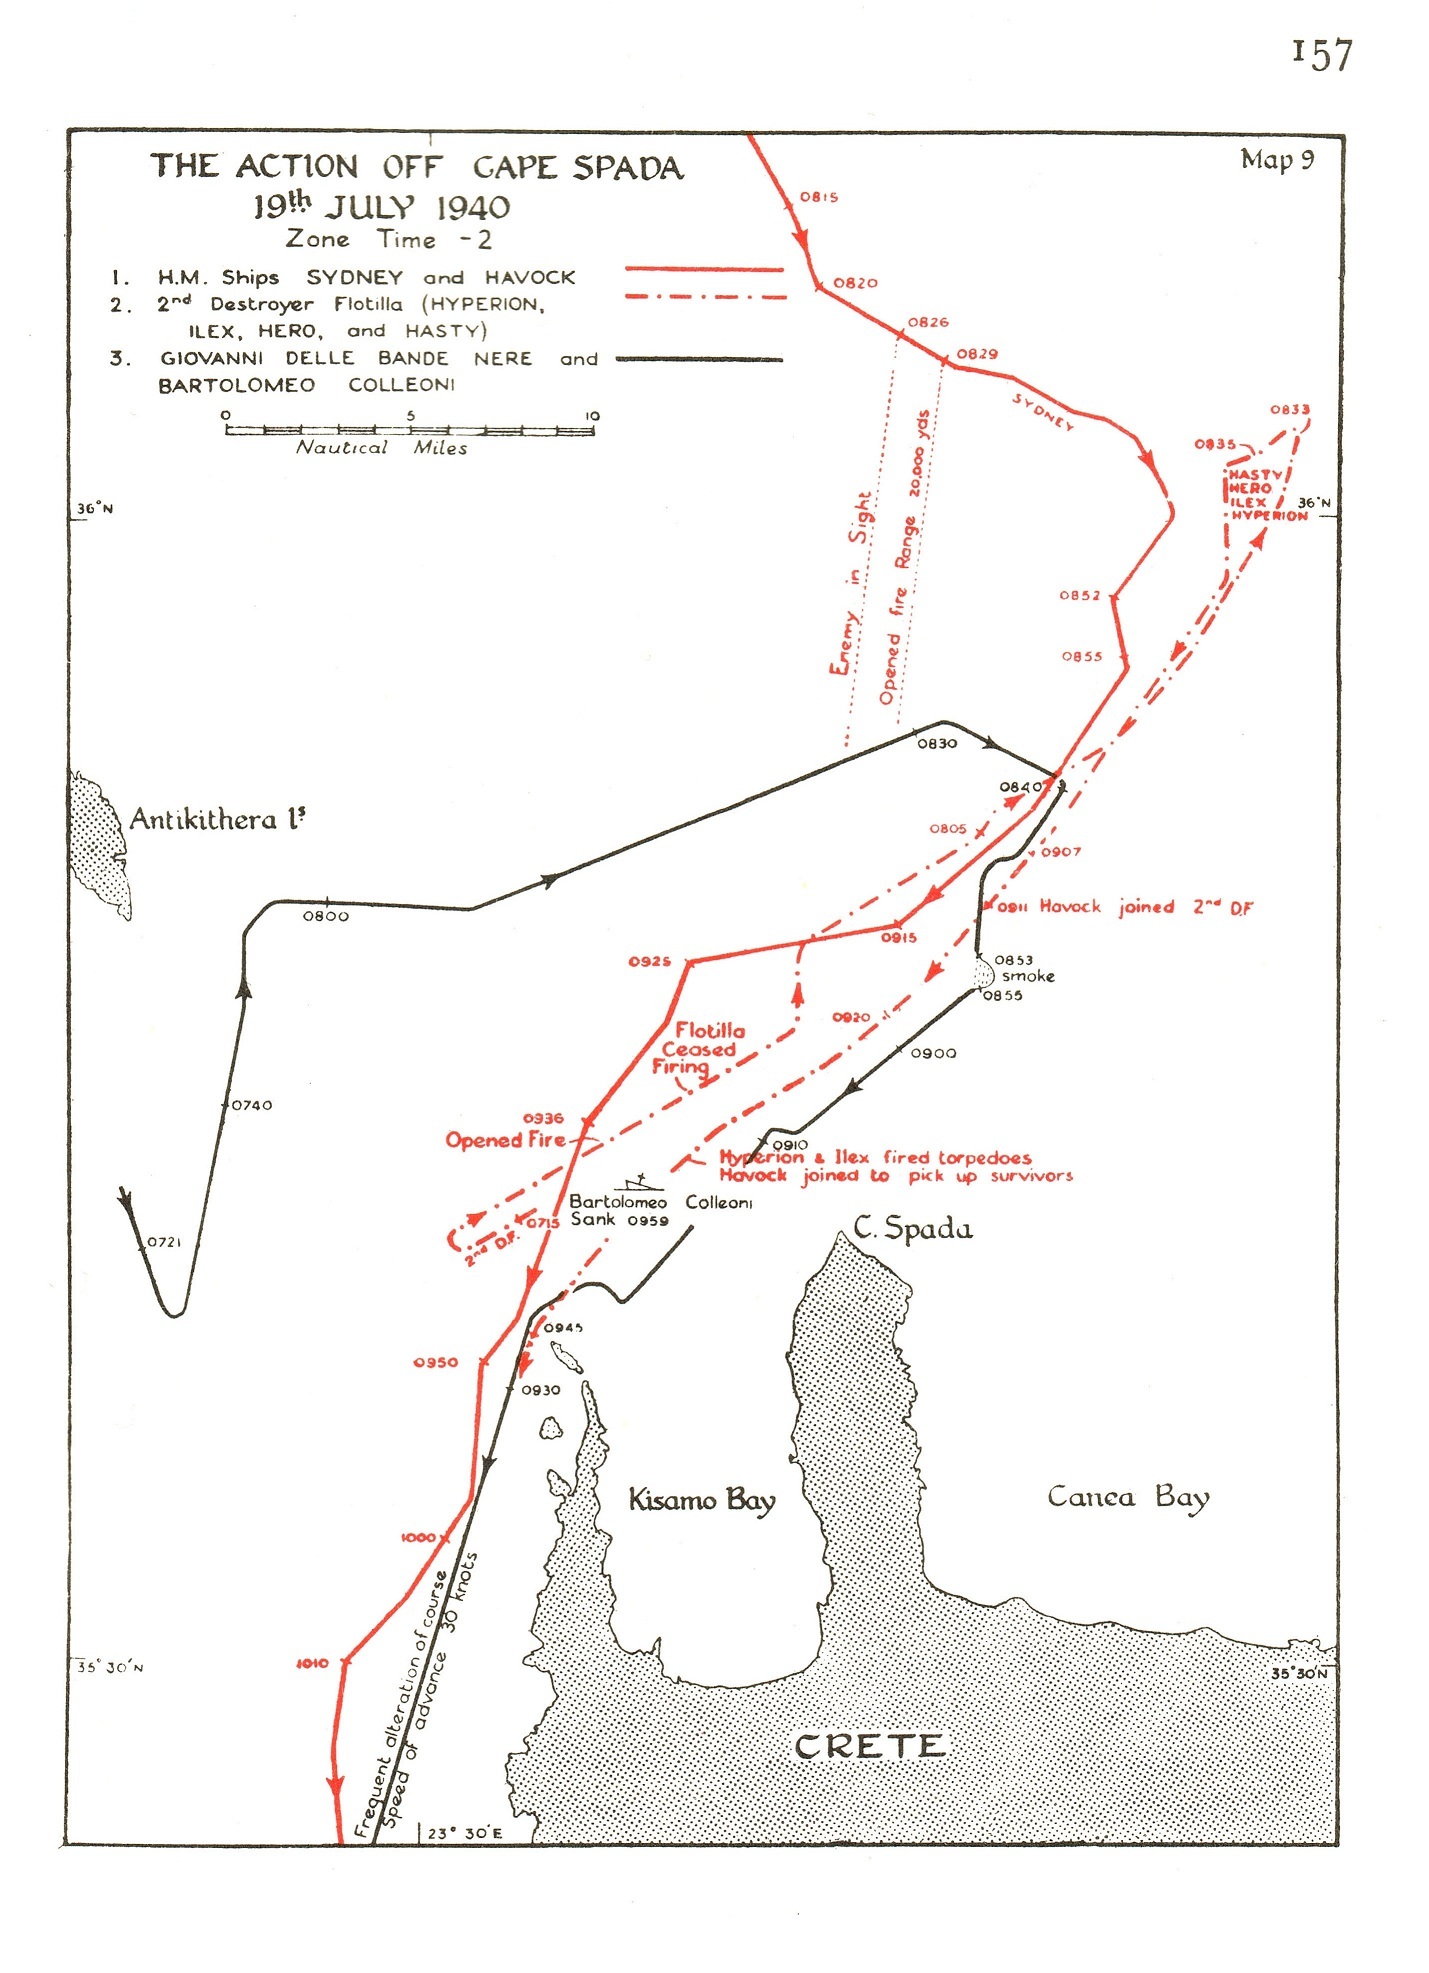
If you're not familiar with the event, essentially pair of Italian light cruisers engage a quartet of British destroyers running ASW operations northwest of the island of Crete. The RM ships engage, unaware that HMAS Sydney and another British destroyer are also operating in the area. Sydney and her consort respond. Upon Sydney joining the fight, the RM ships turn to disengage, and attempt to make a fighting retreat from the direction they had originally came. Gunfire from Sydney damage both cruisers, and Bartolomeo Colleoni took a hard hit to her powerplant leaving her dead in the water and without her main battery functioning. Shortly after, she took several torpedo hits from the destroyers and sank. Giovanni dalle Bande Nere managed to escape, having taken some damage, and having inflicted a hit on Sydney in return.
A very boilerplate version of the scenario is as follows:
Battle of Cape Spada
Order of Battle
Regia Marina:
Bartolomeo Colleoni
Giovanni dalle Bande Nere
Royal Navy
HMAS Sydney
HMS Hasty
HMS Havock
HMS Hero
HMS Hyperion
HMS Ilex
Setup
The Royal Navy's destroyers HMS Hasty, HMS Hero, HMS Hyperion and HMS Ilex deploy anywhere within the deployment area as shown.
Italian cruisers Bartolomeo Colleoni and Giovanni dalle Bande Nere are deployed anywhere within 10 cm of the Regia Marina home edge.
On the beginning of turn four, HMAS Sydney and HMS Havock are deployed anywhere within 10cm of the Royal Navy home edge.
Victory Conditions Turns 1-3
At the end of a turn, if more than half of the Royal Navy destroyers are fleeing or destroyed, make a command check. On failure, the Regia Marina player is the victor. If one of the Regia Marina players cruisers is fleeing or destroyed, make a command check. On failure, the Royal Navy player is the victor.
Victory Conditions Turns 4+
If the Regia Marina player manages to leave the table edge in the marked area while in control of both cruisers, they may claim victory. If at the end of a turn at least one of the Regia Marina player's cruisers are destroyed or fleeing, the Royal Navy player may claim victory.
I'm sure there's room for tweaking the victory conditions to make them a bit more fair for the RM player. I tried to use the River Plate scenario as a bit of a guideline. I'm also aware of the possibility that the RM player could in theory hang around the home edge until turn four and attempt to retreat, so beyond "it's the whole intent of this scenario that you engage" there could probably be a better incentive. There also could probably be a better attempt to incorporate some terrain. Thoughts?
Please Log in or Create an account to join the conversation.
Naval War HQ replied the topic: Battle of Cape Spada scenario
- Naval War HQ
-

- Offline
- Administrator
-

- Posts: 559
- Karma: 1
- Thank you received: 193
8 years 8 months ago
Game designer
"That which hath been is now; and that which is to be hath already been;" -Ecclesiastes-
Looks great already. Have you considered that you are able to even the odds a little bit by toying around with the stats of the officers of both fleets?
Game designer
"That which hath been is now; and that which is to be hath already been;" -Ecclesiastes-
Please Log in or Create an account to join the conversation.
Pugliese replied the topic: Battle of Cape Spada scenario
8 years 8 months ago
A first pass at the two commanding officers:
Captain John Collins
Large +8
Medium +6
Small +7
2 Squadrons
0 Orders
1 Disruption
Suprise Attack:The first attack made by a squadron in a fleet led by Collins doubles its RoF for each gun weapon system
Vice Admiral Ferdinando Casardi
Large 7+
Medium 6+
Small 6+
3 Squadrons
1 Order
1 Disruption
Cruiser Expert: Once per game, one of your cruisers may reroll all its failed to-hit dice.
I think it's interesting to note that both of these officers went on to do other things in the war. John Collins in particular seemed to have a quite busy career in the Pacific, and was promoted to Commodore 1st class. It might be interesting to revisit him at a later point in his career when he had more experience.
www.navy.gov.au/biography/vice-admiral-s...hn-augustine-collins
Please Log in or Create an account to join the conversation.
Pugliese replied the topic: Battle of Cape Spada scenario
8 years 7 months ago

I just ran a solo playtest of the scenario. Gonna definitely need some tweaking, but it was a fun play, and I was rather surprised by some of what happened. Look for a report sometime Monday.
Please Log in or Create an account to join the conversation.
Naval War HQ replied the topic: Battle of Cape Spada scenario
- Naval War HQ
-
- Offline
- Administrator
-
- Posts: 559
- Karma: 1
- Thank you received: 193
8 years 7 months ago
Game designer
"That which hath been is now; and that which is to be hath already been;" -Ecclesiastes-
Looking forward to it. When you think its ready for others to play I will put it in the official format and up for download if I find the time.
Game designer
"That which hath been is now; and that which is to be hath already been;" -Ecclesiastes-
The following user(s) said Thank You: Pugliese
Please Log in or Create an account to join the conversation.
Pugliese replied the topic: Battle of Cape Spada scenario
8 years 7 months ago

Standing in for the G/H class destroyers are my U/V's and a Tribal for the I-class
Initial Deployment:

Turn 1:
The Royal Navy wins initiative, and goes first.
The British destroyer squadron, having spotted the oncoming cruisers opts to make smoke, but the wind changes unfavorably, blowing the smoke back across the formation.
The Italian cruisers steam towards the group of destroyers, trying to reach range.
The Royal Navy advances their country special.
Turn 1 end:

Turn 2:
In what will be a trend, the Royal Navy wins initiative. This turn, the Regia Marina is forced to go first.
The cruiser squadron continues to bear down on the destroyers.
The destroyers lay down more smoke as they maneuver to present a minimal target
The cruisers open fire at an extreme distance, hoping to find range, but the destroyers present too small a target to do so.
The Royal Navy finishes advancing their country special, and may now use the orders associated with it.
Turn 2 end:

Turn 3:
The Royal Navy wins initiative, and forces Italy to go first.
The cruisers continue to try to close the gap with the destroyers.
The destroyer squadron, knowing that help is close at hand, comes about while laying smoke. The end result is that the cruiser squadron will be pinned between the destroyers and their soon to arrive support. The lead destroyer of the formation, Hyperion is still exposed and within range of both cruisers.
Both cruisers open fire on Hyperion. Giovanni dalle Bande Nere manages to land a pair of hits on Hyperion, despite it's desperate weaving. One in particular opens up a hole at the waterline, and seawater begins to flood in. Bartolomeo Colleoni likewise lands a hit, this one causing some damage to Hyperion's powerplant.
Hyperion's damage control teams are able to make some hasty repairs to the steam lines, but are unable to stop the flooding. Recognizing the possible seriousness of her situation, her captain orders that she retire.
Turn 3 end:

Turn 4:
The Royal Navy wins initiative, and goes first.
HMAS Sydney and HMS Havock arrive in the path of the Regia Marina cruisers, with Sydney presenting her broadside.
Brittania demonstrates that she rules the waves, and both the destroyer squadron and Sydney/Havock move to close distance and encircle the Italian cruisers. Hasty blunders into a minefield that had been laid by the subs that were suspected to be operating in the area. She strikes a mine, which opens a terrible gash in her hull and causes serious flooding.
The cruisers maneuver in response to this new threat, opening up their line of sight and presenting their broadsides to Sydney and her consort.
Sydney and Havock open fire on Bartolomeo Colleoni, exploiting the surprise caused by their sudden appearance. Collins attempts to push his crews to use their training in rapid firing drills to lay out more fire, but somewhere along the way the order gets garbled. Bartolomeo Colleoni begins weaving immediately, but is unable to completely escape the tremendous volume of fire coming her way. Havock's fire is enthusiastic but inaccurate. Sydney however lands two hits from her main battery that damage one of Bartolomeo Colleoni's boilers. Further damage is caused by Sydney's secondary battery.
The Regia Marina cruisers open up in return. Bartolomeo Colleoni fires on Sydney. A round from her main battery find's Sydney, but passes the funnel causing no real damage. Giovanni dalle Bande Nere is unable to fire on Sydney with her consort in the line of fire, and vents her ire on the destroyer squadron instead. Her main battery punishes the wounded Hyperion, sending it to the bottom. Her secondaries open up on Ilex, but she is unsuccessful in finding range.
Ilex opens fire in return, with her 4.7”s causing some damage to Giovanni dalle Bande Nere's superstructure.
Bartolomeo Colleoni's engineering is unable to get the boiler relit
Hasty's crew battles the flooding, but in the end they can't stop all of it, and the order to abandon ship is given.
Turn 4 end:

Turn 5:
The Royal Navy wins initiative, and goes first.
Sydney and Havock again fire on Bartolomeo Colleoni. This time the Collins' order for rapid fire is relayed successfully, and heavy volume of fire is sent downrange. Havock again proves to be well meaning, but fails to land any hits. Sydney however is able to recognize the evasive pattern that Bartolomeo Colleoni is employing, and lands four hits from her main battery, detonating the port side torpedo launcher and starting a raging inferno. The secondary explosions from ready ammo stowage rack the ship, further damaging the powerplant and hampering her ability to return fire. Bartolmeo Colleoni's crew remains steadfast in the face of this punishment.
Desperate to break away, the two Italian cruisers maneuver with Giovanni dalle Bande Nere unmasking her guns to bring them to bear on Sydney, and the ships launch torpedoes in the path of the Royal Navy ships to attempt to force them to break off.
Bartolomeo Colleoni makes another attempt to punish her tormentor. Again her aim is good, but the shell passes through the superstructure without doing any significant damage. Giovanni dalle Bande Nere trains her main battery on Sydney as well, and is likewise rewarded with a hit, but again Sydney escapes without it causing meaningful damage. She trains her secondaries on Ilex, and is rewarded with a hit on Ilex's bridge.
Ilex's crew take this affront rather personally, and pour fire into Giovanni dalle Bande Nere. A series of shots strike the aft of the ship, severing her rudder chain and leaving it locked to starboard.
Sydney attempts to maneuver into the spread of torpedoes coming her way, but misjudges. One strikes her, causing serious flooding.
Bartolomeo Colleoni's crew desperately fights the towering fire, but it is too little, too late. The surviving crew abandon ship as she is consumed.
Sydney is able to stop the majority of the flooding, but Collins judges she has taken too much damage and expended too much ammunition to continue in pursuit.
Giovanni dalle Bande Nere manages to steer with her props, and limps away. The surviving Royal Navy ships pick up all the survivors they can find, and likewise limp back to port.
The Royal Navy has won today, but at a very steep cost.
Turn 5 Climax:

Thoughts:
The biggest issue I see is that the RM spent two whole turns closing to a range where they could do anything at all, with only one turn to range in and sink or force two destroyers to break off before support arrives and the victory conditions change. And while the 6” guns on the Giusannos have exceptional reach, it really doesn't matter at extreme ranges where they can't hit destroyers to range in. So I feel that moving the destroyer's deployment area to be more centrally located so that they are threatened on the first turn would A) give the RM player more of a change to achieve a victory before having to flee and") more closely mimic the actual scenario, with the chase before Sydney and Havock arrive.
more closely mimic the actual scenario, with the chase before Sydney and Havock arrive.
I thought it was pretty interesting that the first exchange between Sydney and Bartolomeo Colleoni resulted in an engine hit on Bartolomeo Colleoni, and a hit that caused no damage on Sydney.
The RM cruisers put out way more hurt than I had expected when they got stuck in, but I just couldn't make anything stick to Sydney. In retrospect I might should have used the mine on that particular squadron rather than the destroyers, as a success would have possibly caused problems for Sydney, or at the least taken Havock out of the squadron and caused the same loss of order token that I was hoping for when I opted for the destroyer squadron instead. I also should have made use of the AP order, but with Bartolomeo Colleoni giving up her ranged-in markers every time she evaded, I was hesitant to commit to the use of an order for possibly no hits.
Next time I playtest this scenario with the changes, I'm NOT going to give the Royal Navy encouragement by listening to Judas Priests's British Steel.
I also have a question about the Mines special order. I had rolled a superstructure hit for the location, but this seemed odd to me, so I opted treat them the same way torpedo hits are treated instead. Is this the intent?
I may also have overlooked it, but if you split fire with your main battery and secondaries/tertiaries, and you range in with a particular system, are you considered as ranged in with your other systems?
I played this solo, just to feel it out for any possible changes.
Combatants:
Standing in for the G/H class destroyers are my U/V's and a Tribal for the I-class
Initial Deployment:
Turn 1:
The Royal Navy wins initiative, and goes first.
The British destroyer squadron, having spotted the oncoming cruisers opts to make smoke, but the wind changes unfavorably, blowing the smoke back across the formation.
The Italian cruisers steam towards the group of destroyers, trying to reach range.
The Royal Navy advances their country special.
Turn 1 end:
Turn 2:
In what will be a trend, the Royal Navy wins initiative. This turn, the Regia Marina is forced to go first.
The cruiser squadron continues to bear down on the destroyers.
The destroyers lay down more smoke as they maneuver to present a minimal target
The cruisers open fire at an extreme distance, hoping to find range, but the destroyers present too small a target to do so.
The Royal Navy finishes advancing their country special, and may now use the orders associated with it.
Turn 2 end:
Turn 3:
The Royal Navy wins initiative, and forces Italy to go first.
The cruisers continue to try to close the gap with the destroyers.
The destroyer squadron, knowing that help is close at hand, comes about while laying smoke. The end result is that the cruiser squadron will be pinned between the destroyers and their soon to arrive support. The lead destroyer of the formation, Hyperion is still exposed and within range of both cruisers.
Both cruisers open fire on Hyperion. Giovanni dalle Bande Nere manages to land a pair of hits on Hyperion, despite it's desperate weaving. One in particular opens up a hole at the waterline, and seawater begins to flood in. Bartolomeo Colleoni likewise lands a hit, this one causing some damage to Hyperion's powerplant.
Hyperion's damage control teams are able to make some hasty repairs to the steam lines, but are unable to stop the flooding. Recognizing the possible seriousness of her situation, her captain orders that she retire.
Turn 3 end:
Turn 4:
The Royal Navy wins initiative, and goes first.
HMAS Sydney and HMS Havock arrive in the path of the Regia Marina cruisers, with Sydney presenting her broadside.
Brittania demonstrates that she rules the waves, and both the destroyer squadron and Sydney/Havock move to close distance and encircle the Italian cruisers. Hasty blunders into a minefield that had been laid by the subs that were suspected to be operating in the area. She strikes a mine, which opens a terrible gash in her hull and causes serious flooding.
The cruisers maneuver in response to this new threat, opening up their line of sight and presenting their broadsides to Sydney and her consort.
Sydney and Havock open fire on Bartolomeo Colleoni, exploiting the surprise caused by their sudden appearance. Collins attempts to push his crews to use their training in rapid firing drills to lay out more fire, but somewhere along the way the order gets garbled. Bartolomeo Colleoni begins weaving immediately, but is unable to completely escape the tremendous volume of fire coming her way. Havock's fire is enthusiastic but inaccurate. Sydney however lands two hits from her main battery that damage one of Bartolomeo Colleoni's boilers. Further damage is caused by Sydney's secondary battery.
The Regia Marina cruisers open up in return. Bartolomeo Colleoni fires on Sydney. A round from her main battery find's Sydney, but passes the funnel causing no real damage. Giovanni dalle Bande Nere is unable to fire on Sydney with her consort in the line of fire, and vents her ire on the destroyer squadron instead. Her main battery punishes the wounded Hyperion, sending it to the bottom. Her secondaries open up on Ilex, but she is unsuccessful in finding range.
Ilex opens fire in return, with her 4.7”s causing some damage to Giovanni dalle Bande Nere's superstructure.
Bartolomeo Colleoni's engineering is unable to get the boiler relit
Hasty's crew battles the flooding, but in the end they can't stop all of it, and the order to abandon ship is given.
Turn 4 end:
Turn 5:
The Royal Navy wins initiative, and goes first.
Sydney and Havock again fire on Bartolomeo Colleoni. This time the Collins' order for rapid fire is relayed successfully, and heavy volume of fire is sent downrange. Havock again proves to be well meaning, but fails to land any hits. Sydney however is able to recognize the evasive pattern that Bartolomeo Colleoni is employing, and lands four hits from her main battery, detonating the port side torpedo launcher and starting a raging inferno. The secondary explosions from ready ammo stowage rack the ship, further damaging the powerplant and hampering her ability to return fire. Bartolmeo Colleoni's crew remains steadfast in the face of this punishment.
Desperate to break away, the two Italian cruisers maneuver with Giovanni dalle Bande Nere unmasking her guns to bring them to bear on Sydney, and the ships launch torpedoes in the path of the Royal Navy ships to attempt to force them to break off.
Bartolomeo Colleoni makes another attempt to punish her tormentor. Again her aim is good, but the shell passes through the superstructure without doing any significant damage. Giovanni dalle Bande Nere trains her main battery on Sydney as well, and is likewise rewarded with a hit, but again Sydney escapes without it causing meaningful damage. She trains her secondaries on Ilex, and is rewarded with a hit on Ilex's bridge.
Ilex's crew take this affront rather personally, and pour fire into Giovanni dalle Bande Nere. A series of shots strike the aft of the ship, severing her rudder chain and leaving it locked to starboard.
Sydney attempts to maneuver into the spread of torpedoes coming her way, but misjudges. One strikes her, causing serious flooding.
Bartolomeo Colleoni's crew desperately fights the towering fire, but it is too little, too late. The surviving crew abandon ship as she is consumed.
Sydney is able to stop the majority of the flooding, but Collins judges she has taken too much damage and expended too much ammunition to continue in pursuit.
Giovanni dalle Bande Nere manages to steer with her props, and limps away. The surviving Royal Navy ships pick up all the survivors they can find, and likewise limp back to port.
The Royal Navy has won today, but at a very steep cost.
Turn 5 Climax:
Thoughts:
The biggest issue I see is that the RM spent two whole turns closing to a range where they could do anything at all, with only one turn to range in and sink or force two destroyers to break off before support arrives and the victory conditions change. And while the 6” guns on the Giusannos have exceptional reach, it really doesn't matter at extreme ranges where they can't hit destroyers to range in. So I feel that moving the destroyer's deployment area to be more centrally located so that they are threatened on the first turn would A) give the RM player more of a change to achieve a victory before having to flee and
more closely mimic the actual scenario, with the chase before Sydney and Havock arrive.I thought it was pretty interesting that the first exchange between Sydney and Bartolomeo Colleoni resulted in an engine hit on Bartolomeo Colleoni, and a hit that caused no damage on Sydney.
The RM cruisers put out way more hurt than I had expected when they got stuck in, but I just couldn't make anything stick to Sydney. In retrospect I might should have used the mine on that particular squadron rather than the destroyers, as a success would have possibly caused problems for Sydney, or at the least taken Havock out of the squadron and caused the same loss of order token that I was hoping for when I opted for the destroyer squadron instead. I also should have made use of the AP order, but with Bartolomeo Colleoni giving up her ranged-in markers every time she evaded, I was hesitant to commit to the use of an order for possibly no hits.
Next time I playtest this scenario with the changes, I'm NOT going to give the Royal Navy encouragement by listening to Judas Priests's British Steel.
I also have a question about the Mines special order. I had rolled a superstructure hit for the location, but this seemed odd to me, so I opted treat them the same way torpedo hits are treated instead. Is this the intent?
I may also have overlooked it, but if you split fire with your main battery and secondaries/tertiaries, and you range in with a particular system, are you considered as ranged in with your other systems?
Please Log in or Create an account to join the conversation.
Bezmozgu replied the topic: Battle of Cape Spada scenario
8 years 7 months ago
Great AAR -- thanks! Good luck with the refinements to your scenario; it already looks like a winner.
Please Log in or Create an account to join the conversation.